Certificates

The Certificates Screen can be accessed directly from the Main Reports Menu or by entering Alt+R-C. The primary purpose of this screen is to create certificates for items that you may have calibrated or for which you have performed maintenance.
Preparation
Some preparation is required before you can create a usable certificate.
- Set the certificate properties properties that are shown in the grid. The values that are shown here are just examples. To change a value just click on the appropriate cell in the grid.
- Open the Report Designer to create a custom certificate.
- On the Report Designer menu,select open.
- Open Certificate.fr3 file.
- Save the file using the "Save as" menu command giving it a new name.
- Now, you are ready to begin editing the file. You can press F1 for guidance on how to proceed.
- Once you are satisfied with the new format save the file and close the Report Designer.
- Confirm that the report name now appears in the User Certificate section of the list box on the left.
- Click the Show command button to preview and/or print the certificate.
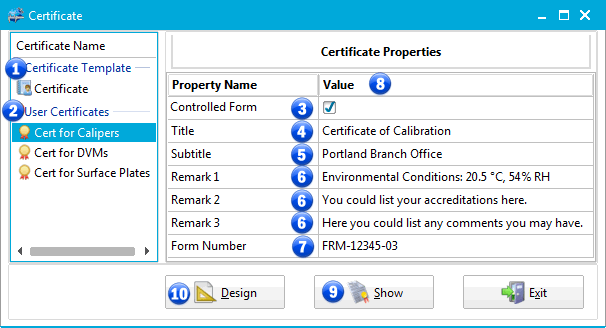
Certificates Screen
1 - Certificate Template group in the list view
This group will contain only one item, the master certificate. Please keep in mind that any time TrackPro is updated, a field is renamed or the language that is being used is changed that this file will be re-created to account for those changes. Because of this, you should never edit this file expecting that the changes will be persistent. Always use the Save as function in the Report Designer so that your changes will be preserved.
2 - User Certificates group in the list view.
Provided that you save custom Certificates or other forms in the certificates folder, they will be visible in this group.
3 - Controlled Form
If your company requires the use of controlled forms check the box as shown. Doing so will prevent Power Users and Users from accessing the report designer and changing property values.
4 - Title
The Title will appear at the top-center of the certificate in large bold print
5 - Subtitle
The Subtitle will appear just below the title in small italicized print.This property may be ignored if you don't wish to use a subtitle.
6 - Remarks 1 through 3
Remarks will appear immediately after information regarding standards used. If the Remark is blank its caption will not appear on the form. You may enter up to 256 characters in each remark.
7 - Form Number
The form number will appear in the right-hand corner near the bottom of the page.
8 - Values
Except for the "Controlled Form" property all the values are string values that may contain up to 255 characters.
9 - Show Command Button
The Show Command Button opens the report preview screen from which you can view and print the certificate. Prior to opening the screen you will be requested to enter the item number for which you would like to create the certificate.
10 - Design Command Button
The Design Command Button opens the Report Design to Certificate you have selected in the list view.