Report Preview Screen

Screens > Report Preview Screen
The Report Preview Screen is shown under the following circumstances:
- Show Report on the Reports Screen is clicked.
- Show button on the Labels screen is clicked.
- Show button on the TrackPro Controlled Form is clicked.
- When the Windows Scheduler runs a status report.
The screen will display the report as it will be seen it when it is printed. A Toolbar is displayed at the top of the screen that allows you to take several actions. Each action has an associated icon. There meanings are discussed below.
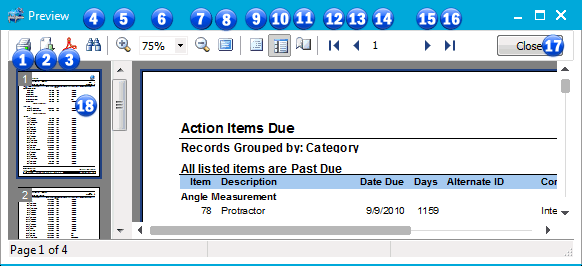
Report Preview Screen
1 - ![]() Print
Print
The print button opens the print dialog so that the report may be printed. The number of copies and the printer may be selected at that time.
2 - ![]() Export
Export
The export button will reveal a menu that will allow you to export the report in one of the following formats:
- PDF - Portable Document Format
- HTML - Hypertext Markup Language
- CSV - Comma Separated Values
- Excel Table (OLE)
3 - ![]() Export to Adobe
Export to Adobe
This control exports the Report to and Adobe Acrobat file (PDF).
4 - ![]() Find
Find
The Find button opens a "Find Dialog" so that you can search for any text in the report.
5 - ![]() Zoom In
Zoom In
Clicking the Zoom in control will expand the preview size in 25% increments. You can make the image as large as you would like
6 - ![]() Zoom Presets
Zoom Presets
Zoom Presets are available for 25%, 50%, 75%, 100%, 150%, 200%, Page Width and Whole Page.
7 - ![]() Zoom Out
Zoom Out
Clicking Zoom Out will decrease the preview image size in 25% increments until the minimum of 25% is reached.
8 - ![]() Full Screen
Full Screen
Full Screen will remove the Toolbar and expand the report image to fill the screen. Double-Click the Screen to exit this mode.
9 - ![]() Outline View
Outline View
Clicking this control will display an outline view (18) of the report on the left side of the screen. This control is applicable only to grouped reports. You can use the outline view to rapidly navigate through the report. Clicking on a group name in the list will automatically display the portion of the report that contains the selected group.
10 - ![]() Thumbnail View
Thumbnail View
The Thumbnail View button will show a thumbnail image of each page in the report on the left side of the screen. The page number on the upper left of the thumbnail. The thumbnail view may be used to rapidly navigate through the report.
11 - ![]() Page Settings
Page Settings
Clicking the page settings button will open the Page Settings Dialog permitting you to set the paper size, margins and orientation of the printer.
12 - ![]() First Page
First Page
Moves to the first page of the report.
13 - ![]() Previous Page
Previous Page
Moves to the next page of the report.
14 - ![]() Current Page
Current Page
Shows the current page of the report.
15 - ![]() Next Page
Next Page
Moves to the previous page of the report.
16 - ![]() Last Page
Last Page
Moves to the next page of the report.
17 - ![]() Close
Close
Closes the screen.
18 - Thumbnail or Outline View
Depending upon the selection in the toolbar, the outline or thumbnail view will be shown.