Reports

The Reports screen provides one centralized area to view reports as well as modifying and creating reports. TrackPro has a wide variety of reports that are built in to the application. These reports should satisfy most needs that you will have. You may also modify or design your reports using the Report Designer which is done by
Reports Screen
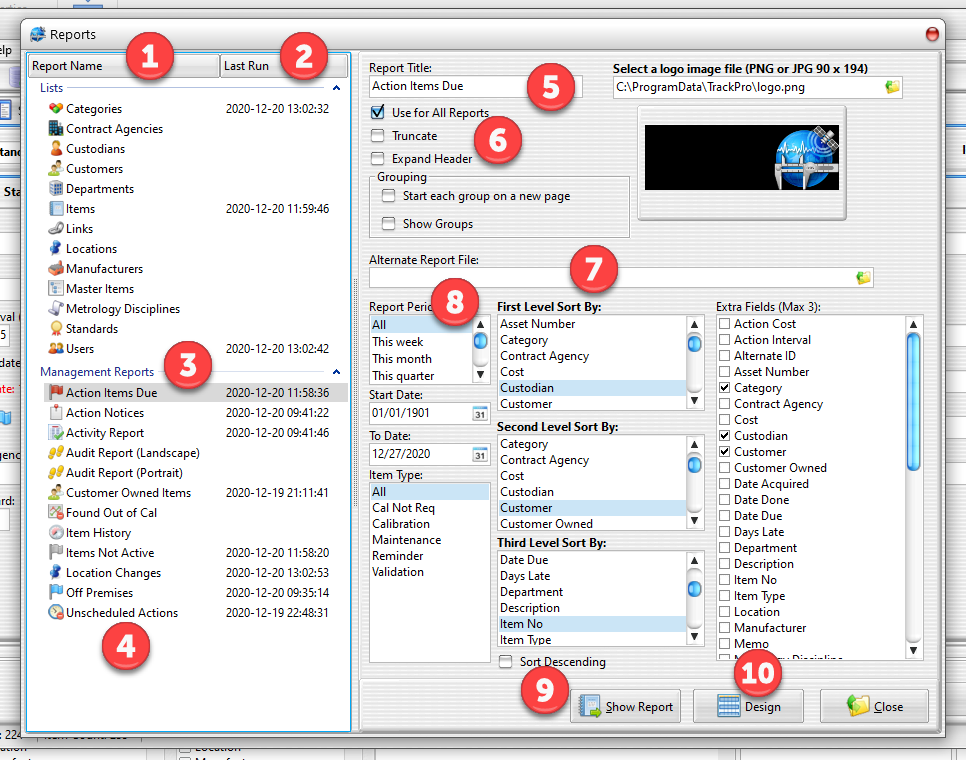
TrackPro reports can be categorized into 3 types displayed by the numbers 2, 3 and 4 in red :
- Lists
- Management Reports
- User Reports
Management Reports and Lists
Each report has a number of configuration options. TrackPro will remember all the report options that you selected.
When you start a new report session, TrackPro will load the setting for the last report that you ran.
Reports will be displayed in the language that you have selected for TrackPro.
1 - Report Name Column
The column shows the translated report file name minus the *.fr3 file extension. You may double-click any report to open it with the current configuration settings.
2 - Last Run Column
The column displays the last date and time that this report was run by the current TrackPro user.
Under 1 and 2 List Type Reports
List reports are simple lists of items, lookups users, etc.
- The Categories Report will print a sorted list of all Categories in the TrackPro database and the number of items assigned to each.
- The Contract Agencies Report will print a sorted list of all Contract Agencies in the TrackPro database. Each section will display all information regarding the contract agency.
- The Custodians Report will print a sorted list of all Custodians with their email addresses, phone numbers and the number of items assigned to each.
- The Customer Report will print a sorted list of all Customers in the TrackPro database. Each section will display all information regarding the customer.
- The Departments Report will print a sorted list of all Departments in the TrackPro database and the number of items assigned to that department.
- The Item Report will print all items irrespective of the items status. The Report may be grouped and includes 3 selectable fields.
- The Item Links report will print all the links that are show in the form view in the links grid. The report may be grouped.
|
|
Tip: If you choose to export this report to portable document format (PDF) the link address is formatted as a hypertext link so that you can access the referenced documents directly from the report. |
- The Locations Report will print a sorted list of all Locations in the TrackPro database and the number of items assigned to that location.
- The Manufacturers Report will print a sorted list of all Manufacturers in the TrackPro database. Each section will display all information regarding the manufacturer.
- The Master Items Report will print in hierarchical format all master items that have been referenced in the Part of field.
- The Metrology Disciplines Report will display all Metrology Disciplines in the TrackPro database and the number of items assigned to each.
- The Standards Report will print a list of all items in the TrackPro database that have been designated as a standard by entering a value into the Standard Type field.
- The Users Report will provide you a listing of all users, their Full Names, Employee Number, and Security Level. Additionally, it will show if the User Account is disabled and the last time the user logged in.
3 - Management Reports
Management Reports are generally complex than list reports. They will report on such information as Status, performance, current location, etc.
- The Action Items DueReport may be used to determine which items are due for action from the present date until any future date. You can choose up to three additional fields to be included in the report.
Note: If you want items to appear on the "Items Due for Action" report, the item status must be set to "Active."
- The Action Notices Report prints Calibration Notices for a specified time period. You may specify the time period by entering dates or by selecting on the internally provided report periods.
- The Activity Report is management report that lists all item activity during a specified time period. You may specify the time period by entering dates or by selecting on the internally provided report periods. The report can be grouped. It display the items on which actions were taken, the number of on-time and late actions. The report calculates the days late or early for each item and a grand average of the days late or days early.
- The Audit Reports can be printed in either Landscape or Portrait format. The Audit report will show you every change that has been made to the database during a user specified time period. The report can be grouped or sorted by:
- Record ID
- Action (Add, Edit, Delete, or Undelete)
- Date (Date of the Change)
- User (Person who made the change)
- Table Name
- Field Name
- Old Value
- New Value
- The Customer Owned Items Report will display all Customer Owned equipment with The customer name, description, alternate ID and item number.
- The Found Out of Cal Report will display a list of items number and dates that were not marked as "Pass" when an action was recorded.
- The Item History Report will list all the information for an item that is contained in the Item Master Table. It also provides a complete listing of all the actions that have been taken on a particular item. After you have clicked the report to display it, you will be prompted to enter an item number.
- The Items Not Active Report will print only those items that do not have "Active" status. This report can be grouped.
- The Location Changes Report will provide a list of all item location changes that have taken place. The report can be limited to a specific time period and it can be grouped.
- The Off Premises Report will provide you a listing of all items that have been sent to a contract agency. Be sure to use the "Out" and "In" tool bar buttons so that this report will be accurate. You can group this report on any field.
- The Unscheduled Actions Report will display a listing of all actions for which the Unscheduled? option was checked when completing the Record Action and/or Received Item forms. You may group and sort the report by any field.
4 - User Report
User Reports, as the name says, are reports that have been created by a user. Generally, you should not modify the existing TrackPro reports but save them as user reports. WARNING: If you change languages or change translations all Lists and Management Reports will be overwritten. If you want to preserve your changes be sure to save the reports under a new file name.
5 - Report Title and Image
Report Title
You can assign any report a different title without modifying the underlying report. The Report Title will appear at the top of the report page.
Company Logo: Select an image file.
You can assign a logo or any other image to appear on your reports. The image may be used for all reports or just for the current one.
TrackPro can utilize the following image formats:
|
Bitmap |
*.bmp |
|
Graphic Interchange Format |
*.gif |
|
Joint Photographic Experts Group |
*.jpg |
|
Portable Network Graphics |
*.png |
Best results will be obtained if you form at your logo using a 2.67:1 aspect ratio. TrackPro will automatically scale the image to fit in the allotted area of the report.
6 Additional Report Items
Image Preview Window Here you will see your logo image as it will appear on the report.
Use for All Reports Check this box to use the current image for all reports.
Truncate Sometimes text will be too wide to print in the space provide. By default TrackPro will print the text using as many lines necessary.
You can truncate the text at one line by check this box.
Expand Header Default field column headers may be too wide to display on one line. You have your choice of expanding the column header
to it in its entirety or you can uncheck this box to truncate the header at one line.
Start each group on a new page This control is active only when the Group By list contains field entries. If this box is checked TrackPro will
start each report group on a new page rather than continuing on the same page.
Show Groups Checking this control will group items in the report by the Field chosen in the Sort By List Box. A group header and group footer will be displayed.
7 - Alternate Report File - will be removed.
8 - Report selections
Report Period
This control works in conjunction with the Start Date (18) and To Date (19). Changing the selection in this control will load the requested time period into the two controls. For example; If today is 10/15/2012,and you select "Last Quarter," the Start Date will be set to 07/01/2012 and the To Date will be set to 10/01/2012. The control is disabled when it cannot be used.
Sort By
For reports that allow sorting, you have up to 3 levels of sorting. You can pick from First or Second or Third levels to make your report more robust.
Extra Fields (Max 3)
If a report allows extra fields, a list of the fields will be displayed. Select the fields by applying check marks.
Start Date
This control sets the Start Date and time to 00:00:01 of the date shown. This control may be set entering the date or it can be automatically set using the Report Period control (13). The control is disabled when it cannot be used.
To Date
This control sets the To Date and time to 00:00:01 of the date shown. This control may be set by entering the date or it can be automatically set using the Report Period control (13). The control is disabled when it cannot be used.
Item Type
This control allows you to select the Item Types that will be printed. It is only available where it is applicable to the type of report to be print. The control is disabled when it cannot be used.
Sort Descending
This control allows you to select the sort order for report items. Check the box to sort items in descending order or uncheck for ascending order.
9 - Show Report
Reports may be displayed or refreshed in one of two ways:
- Double-click the desired report in the report name list
- Click the Show Report command button.
10 - Report Designer
Click this button if you wish to modify a user report and save the modifications. When a new report is generated it will not be displayed until the report window is closed.