Received Item and Record

Screens > Received Item and Record
Effectively the Received Item No (In) and Record Screens are identical. They differ only with the validations they make before opening and the presence or absence of the Date Back field. The Date Back Field will be absent on the Record form.
The Received Item Number Screen (In) is accessed from the Main Actions Menu, by entering ALT-A+R or clicking the ![]() icon on the ToolBar. The screen is used to record the return of equipment that has been sent to an external agency for calibration or maintenance. Before using the In command you must move to the Item Number for which you would like to record the return.
icon on the ToolBar. The screen is used to record the return of equipment that has been sent to an external agency for calibration or maintenance. Before using the In command you must move to the Item Number for which you would like to record the return.
TrackPro will check to ensure that the item was recorded as having been sent out. If it wasn’t sent out you will receive an error message. You will then have to use the send out function to record the fact that the item was sent out before you can get the item back.
The Record Screen is accessed from the Main Actions Menu, by entering ALT-A-E or clicking the ![]() icon on the ToolBar.
icon on the ToolBar.
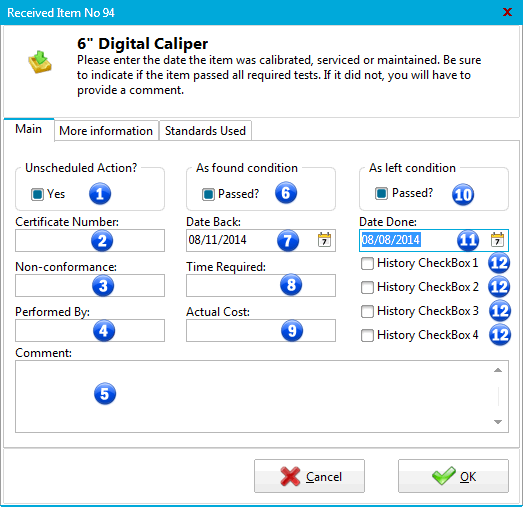
Received Item No Screen - Main Tab
The Received Item Number screen will be displayed as shown. The Date Back will default to the current date. You may record a comment. If the Item Passed field is checked, you will be required enter a comment explaining any ramifications the incident may have. The User Name of the person performing this action will be automatically recorded. If desired, you may also record the calibration certificate number, whether or not the item action was scheduled, the actual time required, the actual cost of the action, non-conformance report number, and/or the person who performed the action. TrackPro will automatically create a new record in the History View that will contain the new "Date Due."
1 - Unscheduled
If the action being recorded was not scheduled, you will be given the option of keeping the current due date or scheduling a new one. The underlying database field is Unscheduled.
2 - Certificate Number
The certificate number is not a required field .The underlying database field is Certificate Number.
3 - Non-conformance
You can use this field to reference a nonconformance report. The report itself may link to the Item in the "Item View" on the Main Form. The underlying database field is Non-conformance.
4 - Performed By
Enter the name of the person that performed the action. This is not a required field. The underlying database field is Performed By.
5 - Comment
You may enter a comment up to 255 characters in length. The underlying database field is Comment. The underlying database field is Comment.
6 - As Found Condition
This field is used to document the condition of the equipment as you found it. This is a mandatory field. If this field is not checked, you will be required to enter an explanation in the comments. If you do not set this field to checked or unchecked, you will not be able to exit the form. The underlying database field is As Found.
7 - Date Back
The date back field will default to the current date. It should relate to the date that the item was received from the Contract Agency. The underlying database field is Comment.
8 - Time Required
If applicable, enter the actual time required in decimal format. The underlying database field is Time Required.
9 - Actual Cost
If applicable, enter the actual cost of the action. The underlying database field is Actual Cost.
10 - As Left
This field is used to document the condition of the equipment as you left it. This is a mandatory field. If this field is not checked, you will be required to enter an explanation in the comments. If you do not set this field to checked or unchecked, you will not be able to exit the form. The underlying database field is As Left.
11 - Date Done
The date done will default to three days before the current date, be sure to change this to the correct date. The underlying database field is Date Done.
12 - History Checkboxes 1 through 4
There are 4 user-definable checkbox (boolean) fields). The underlying database fields are User-defined History Checkbox Fields.
|
|
Tip: User defined fields can be named anything that you like. To rename a field user the Translator Screen. Your changes will be applied to all Application locations. |
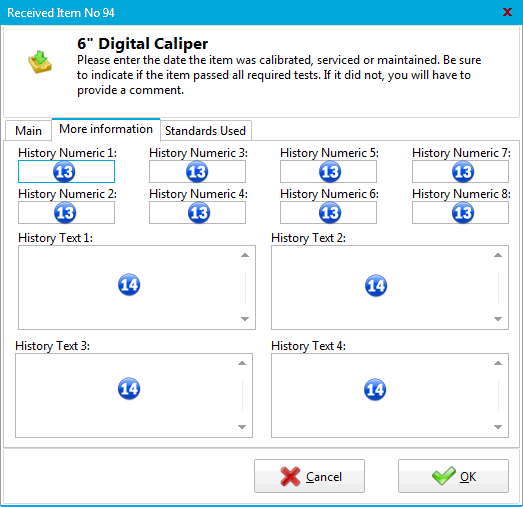
Received Item No Screen - More Information Tab
13 - History Numeric 1 through 8
There are 8 user-definable numeric fields). The underlying database fields are User-defined History Numeric fields.
14 - History Text 1 through 4
There are 4 user-definable texts fields. These fields have a maximum length of 255 characters.The underlying database fields are User-defined History Checkbox Fields.

Received Item No Screen - Standards Used Tab
15 - Select Box
Use the "Select Check Boxes" to indicate that a standard was used in the calibration of this. The standards that appear in this list are those items that have been designated as standards by entering a Standard Type on the main form. The use of this control is optional.
16 - Active Standards Grid
The Active Standards Grid displays all standards that have an active status and are not due for calibration. If the standard is past due for calibration it will Not be displayed here. Except for the "Select" field you cannot edit this grid. If you wish to edit the underlying information; do so on the main form. If you wish to correct this information at a later time you may do so by going to the History Tab on the Main Screen.