ScreenShot

The ScreenShot Screen is accessed from the Main File Menu and selecting Print Screen or by entering ALT-F+P. The screen can also be open using the Hot-Keys CTL-ALT+F5. This permits you to open the the screen even when the Main Menu is inaccessible.
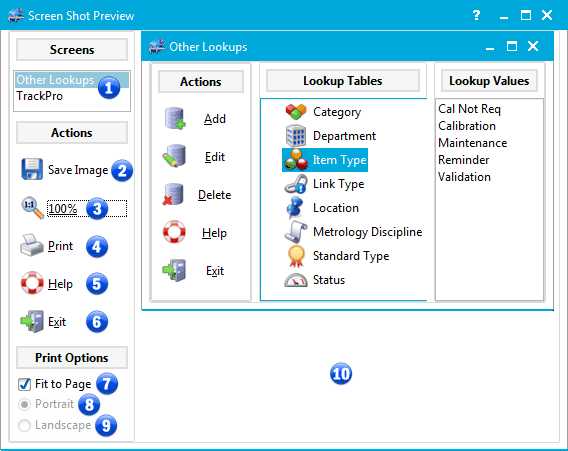
ScreenShot Screen
1 - Screens List Box
The Screens list box displays the screens that are open in the TrackPro application. You can select the screen that you wish to view or print by selecting one of the items in the list box.
2 - Save Image
The Save Image command button will save the selected image to a file. You can save images to the following formats:
- png Portable Network Graphics
- jpg Joint Photographic Experts Group
- bmp Bitmap
When you click the command button a dialog form will open that allows you to select the file format and the file location. The default format is bmp.
3 - 100%
Clicking the command button will display the image at its actual (1:1) size.
4 - Print
Sends the currently selected image to the default printer.
5 - Help
The Help command button opens the help file to the page that contains information regarding the ScreenShot Screen/
6 - Exit
The Exit command button closes the form.
7 - Fit to Page
The Fit to Page check box, when checked, will cause the selected screen to be printed to the largest possible image. The orientation of the image on the paper will be automatically determined.
8 - Portrait
The Portrait option is enabled when the Fit to Page check box is unchecked. Selecting the option causes the image to be printed in portrait mode.
9 - Landscape
The Landscape option is enabled when the Fit to Page check box is unchecked. Selecting the option causes the image to be printed in landscape mode mode.
|
|
Note: If either the Portrait or Landscape options are selected, TrackPro will check to be sure the selected screen is not too larger for your printer's maximum printable are. If the image is too large you will generate an error. See Message 9170. |
10 - Screen Image Preview
This area of the screen allows you to preview the selected screen that is to be printed.