Form View Tab
Screens > Main Screen > Form View Tab
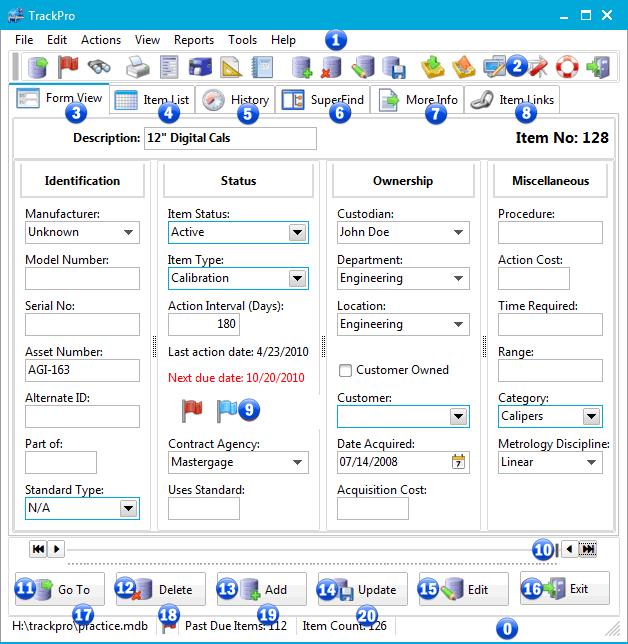
The Form View Tab displays the most of the content of the Item Master Table. It is the default TrackPro View. Item information may be edited. Records are created using the Add Item Wizard. Many of the fields lookup data from tables that are maintained by the database administrator. For information on each field in the table, click on the fields in the Form View shown below. Additional information regarding the screen segments is available below. The Item information is broadly categorized by:
- Identification
- Status
- Ownership
- Miscellaneous

TrackPro Main Screen - Form View
0 - Status Bar - Item Count
This panel displays the number of items contained in the TrackPro database.
1 - Main Menu
The Main Menu provides the primary navigation method to all TrackPro function. The may be access by clicking or you may use the shortcut keys that are revealed by the letter that is underline when you press the Alt Key.
2 - ToolBar
The ToolBar allows rapid access to the most used functions in the Main Menu.
3 - Form View Tab
TrackPro defaults to the Form View when it is opened. It is the view that is shown above.
4 - Item List Tab
Clicking the Item List tab will reveal a list of all items in tabular format, similar to what you might see in Microsoft Excel
5 - History Tab
The History Tab displays that all the actions that have been taken on the current item.
6 - SuperFind Tab
The SuperFind Tab is a hierarchical tree view of the items in the TrackPro database.
7 - Item Links Tab
The Item Links Tab displays all links that are associated with the current Item
8 - More Info Tab
The More Info Tab will display the Memorandum field, and user-defined fields contained in the ItemMaster Table.
9 - Flag
Flags are used to indicate the status of equipment, In the case show the equipment is Past Due an out for calibration. Click here for a legend of all flags.
10 - Record Navigator
Drag the pointer to the approximate location in the database for the record you are looking for. Use the arrow keys to navigate forward or back one record at a time.
11 - Go To
This command will allow you to move directly to a specific record. The Go To command will search the field selected using the Sort By Screen. The default is Item No. The default search field is Item number. When the dialog box opens just enter the item number in the space provided and click OK.
12 - Delete
This command permits administrators to delete an item including all of its history and links. Important: I do not recommend that you delete items because traceability will be lost. By default this button is disabled. However, if you have to do it here are the instructions.
13 - Add Items
The Add Command button launches the Add Item Wizard.
14 - Update
Clicking the Update button will save the changes made to the current item.
15 - Edit
The Edit button must be clicked to make changes to the database. When clicked the Caption and Icon will change to "Cancel Edit." Clicking cancel edit will cancel all changes since the last update.
16 - Exit
Clicking Exit will close the TrackPro application.
17 - Status Bar - Data location
The first panel in the Status bar will show the path to current TrackPro file.
18 - Status Bar - Global Past Due Flag
A red flag will be displayed if any items are past due for action; a green flag will be displayed if everything is up to date..
19 - Status Bar - Past Due Items
This panel will display the number of past due items.
20 - Status Bar - Hints
Application hints and other messages regarding status are displayed here.
