Labels
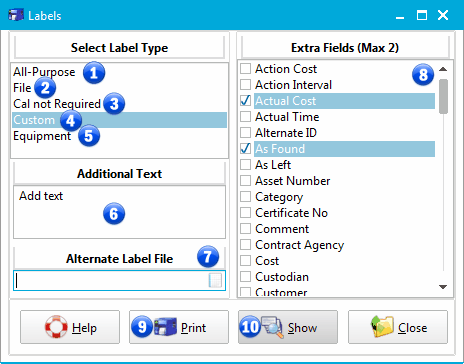
The Labels Screen is accessed from the Main Reports Menu or by entering ALT+R+P. TrackPro can print a variety of labels for the currently selected record. Preformatted labels include all-purpose, file, no calibration required, custom and equipment labels. Prior to printing labels you must select the label printer using the Select Default Printers command on the File menu.

Labels Screen
The labels are formatted to use commonly available labels used by label printers. The formats for these labels are contained the files located in the TrackPro user’s folder at ..\Reports\Labels. If you remove these files from the folder you will not be able to print labels.folder. You can use the Report Designer to modify these labels or create new ones.
1 - All-Purpose Label
This label as its name suggest may be used for just about any purpose.
Size: 2/3" x 2-1/8" (17mm x 54mm)

2 - File Label
As the name suggests, this label is design to fit on the tab of typical file folders.
Size: 2/3" x 3-7/16" (17mm x 87mm)

3 - Cal not Required Label
It is as good idea to label measurement equipment that does not require calibration and keep a record as to why the equipment does not require calibration.
Size: 0.9" x 0.9" (23mm x 23mm)

4 - Custom Label
The label permits you two additional fields of your choice. Also two lines of text can be added to the bottom of the label. Select the fields by checking the desired fields on the list to the right.
Size: 2/3" x 2-1/8" (17mm x 54mm)

5 - Equipment Label
This label is formatted to fit conveniently on an instrument. Many label manufacturers of often sell solvent resistant versions of the label. This label reserves sufficient space for the calibrator's initials.
Size: 0.9" x 0.9" (23mm x 23mm)

6 - Additional Text
The additional text box is only enabled when enabled when the Custom Label is selected.
7 - Alternate Label File
The Alternate Label File Control permits you to substitute an alternate Label report format for the one delivered with TrackPro. New Label Report format files can be created by saving an existing format to a new file name using the Report Designer Screen. This field is disabled for Power Users and Users.
8 - Extra Fields (Max 2)
The extra field check list is only enabled when the Custom Label is selected is selected.
9 - Print
The Print command will send the label to the printer with a preview or access to the Print Dialog. You should only use this after successfully setting up your label printer.
10 - Show
The Show command will allow you to preview your label and give you access the the print dialog screen.